

Learn how to combine Google Contacts and Gmail multi-send to merge names into individualized emails.

In late 2022, Google added the ability to personalize Gmail messages sent from multi-send mode. This means you may now insert a @firstname, @lastname, @fullname or @email field within a multi-send email, and the system will merge the corresponding field data from a recipient’s Google Contact record. More importantly, when Google announced the feature, the company also indicated that “support for custom mail merge tags using spreadsheets” will be added in the future.
Multi-send mode is available to people who use:
- Google Workspace Individual.
- Google Workspace Business Standard or Plus.
- Google Workspace Enterprise Starter, Standard or Plus.
- Google Workspace Education Standard or Plus editions.
Additionally, a Google Workspace administrator must enable the feature by setting Allow Multi-send Mode to ON in the Admin console at Apps | Google Workspace | Gmail | User Settings | Multi-Send mode.
How to manage a recipient list in Google Contacts
A Gmail multi-send merge draws from data in Google Contacts, so make sure you have correct information for each contact field you intend to use in your multi-send merge. If you need to import information into Google Contacts, you may download a Google-provided template to make sure you have data in the correct fields for a .csv import. Open Google Contacts in a desktop-class browser to review the data fields (Figure A) used in the mail merge process:
- Prefix
- First Name
- Last Name
- Suffix
Figure A

First, make sure the data for each recipient is correct in Google Contacts with a review of name and email fields. For ease of use, you may want to label contacts, so you may later select that label to add all associated contacts in an email recipient field.
In most cases, you will also want to create a contact label (e.g., Newsletter as shown in Figure A), then add that label to every contact you wish to include on that list. This makes it possible to then select the label while in the recipient field in Gmail to add all contacts with that label to the recipient list. You may select the checkbox to the left of each contact for a set of contacts, select the label icon (above the list of contacts), then choose your contact label and select Apply to add the label to the selected set of contacts.
SEE: How to manage your Google Contacts (TechRepublic)
Make sure your recipients lists don’t exceed Gmail sending limits or rules. One notable numeric constraint is that the maximum number of recipients for a multi-send email is 1,500 email addresses. Should you send this quantity of email from an organizational address, you’ll be able to send 500 additional email messages that day before you reach the daily overall limit of 2,000 messages.
SEE: How to send mass emails from Gmail (TechRepublic)
The other significant rule is to not send spam: Make sure the people you email are people who want to receive your email. By default, every multi-send email includes an “Unsubscribe” link that allows a recipient to remove themselves from this list. However, when you send email internally — to people within your organization — unsubscribing may not be an option. In other words, people may not be able to unsubscribe from a multi-send internal message, such as those less-than-useful emails from a leader in your organization who has mastered the art of the meaningless missive. If you really wish to never see email from a particular person in your organization, you could configure a filter to archive selected emails automatically.
How to insert mail merge fields in a multi-send Gmail
To create a new multi-send email, you’ll need to use a desktop-class browser, such as Google Chrome as follows:
- Go to Gmail.
- Select the Compose button in the upper left. (If the button isn’t displayed, select the three horizontal line menu option in the upper left corner and then select Mail.) Alternatively, if keyboard shortcuts have been enabled, press the c key.
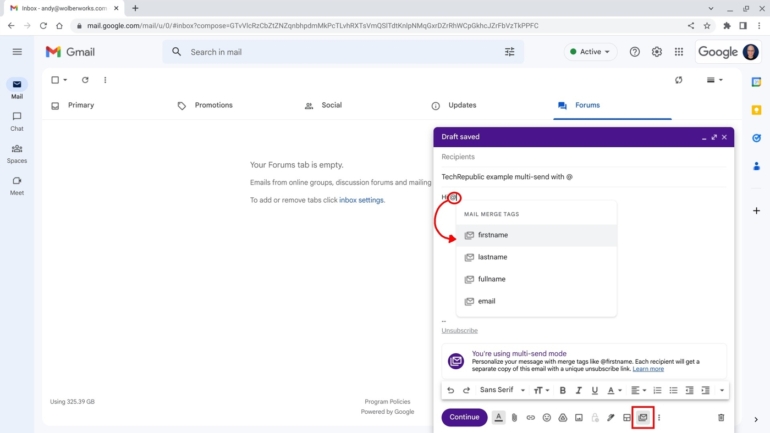
- Select the multi-send icon from the lower-right portion of the compose menu icons, as shown by the red box in Figure B. The icon displays as an envelope placed in front of another envelope. A text box conveys that “You’re using multi-send mode” along with additional text and a link to learn more.
Figure B
- Add recipients (e.g., a set of recipients via a Google Contact label), an email subject and content, much as you might in any standard Gmail.
- Move your cursor in the text area of the email to the place you wish to insert your merge field, then type @ to access available mail merge tags, as shown by the red circle in Figure B. As of March 2023, these include @firstname, @lastname, @fullname and @email.
- Select the desired email tag from the list.
After you have entered all of your multi-send email content, select the Continue button. At that point, you may select:
- Cancel, which allows you to return to editing your email,
- Send preview, to convey a copy of your email to your own Inbox, so you may carefully review the email content, or
- Send all, to perform the merge, which sends an email to each selected recipient.
Since, by definition, multi-send emails go to many recipients, make sure to preview every message before sending. Inevitably, typos, errors, omissions and incorrect dates/times tend to remain well hidden and only reveal themselves after you press Send. Use the Send preview option, combined with careful proofreading to minimize errors.
If one or more recipients lack data in a merge tag you have used, the system will allow you to enter a default alternative (e.g., text to use when no first or last name is present) or return to the draft and modify the recipient list to either add the missing data or remove the recipient. For example, if your email starts, “Hi @firstname!” you might choose “there” for contacts that lack an entered first name, which results in “Hi there!” text to those contacts.


